Azure Backup provides automatic storage management with unconstrained scalability and recovery. Azure Backup also provides application-consistent backups, guaranteeing that no further changes are required to retrieve the data. Using on-premises storage devices with Azure Backup is free of charge. To automatically allocate and manage backup storage, Azure Backup uses a pay-as-you-go model.
In Azure Backup, there are two forms of replication
- Locally Redundant Storage (LRS)
Replicate your data three times in a storage scale unit, with all copies of data existing in the same region. This is a low-cost solution that protects you against local hardware failure.
- Geo Redundant Storage (GRS)
Your data is replicated to a secondary area called azure Paired Region. It is expensive, but it protects against regional outages.
Benefits In Azure Backup
- Unlimited Data Transfer
To import huge amounts of data, there is no fee for data transmitted costs connected with inbound data.
- Data Encryption
Data communication is very secure when using a passphrase or a key.
- Application Consistency Backup
Fixes are not necessary for applications in order to recover the data.
- Long Term Retention
Depending on the backup, the data can be maintained for a long period of time.
How to Setup and Configure Backup to Protect Files, Folders, and System State
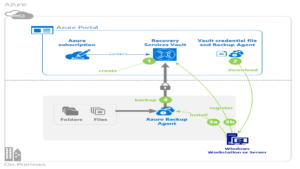 Source- Microsoft
Plan of action at a high level:
-
- Set up Backup Vault
- Backup agent is installed
- Backup to Azure should be scheduled
- Data from Azure can be recovered
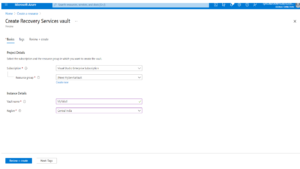
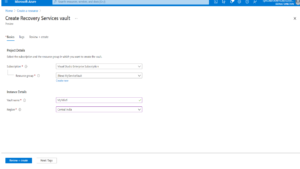
Step-1 : Set up Backup Vault
Backup can be used to store on-premise data in the cloud. Data is encrypted before being stored.
The sections that follow provide a detailed explanation of how to do it with Azure.
We will first Create Recovery Service Vault ,Select Existing or New Resource Group,then fill in the Vault name and desired Region in Instance Details.
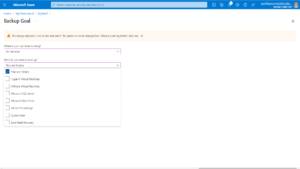
Go to the Backup Option in the “MyServiceVault” Resource Group
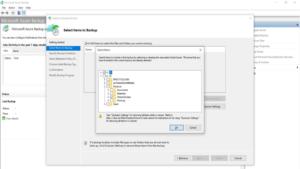
Next, choose two answers to the question “Where is your work currently running?” Choose “On-Premises(Drives)” and answer the question “What do you want to backup?” Choose “Files and Folders” because we will be backing up files and folders from On-Premises.
Step-2 : Backup agent is installed
A Recovery Services vault is a storage entity in Azure that houses data for virtual machines, workloads, servers, and workstations, including data copies and configuration information. Is role-based access control supported by Backup.
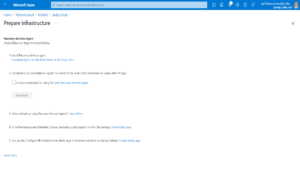
Prepare the infrastructure, Install the Recovery Service Agent(“MARS agent”), At the end of the installation, a ‘Proceed to Registration’ button will appear at the bottom of the pop-up window.
When you click that button, the following screen will appear.
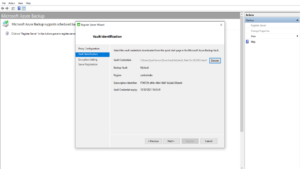
The first step is to identify the vault. Look through the credentials file you saved in the previous step on your computer
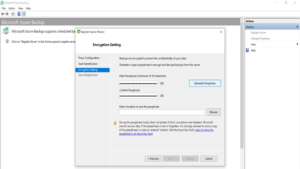
The encryption setting is the next step in the registration wizard. You may either type in your own password or let the wizard generate one for you. Let’s go with ‘Generate Pass’ here.
Look for a location where you’d like to save the password. It’s critical to keep this password file safe because you won’t be able to restore backups without it. After you click Next, the file will be stored at the location you specified.
Step-3 :Backup to Azure should be scheduled
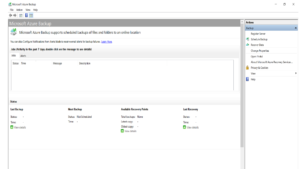
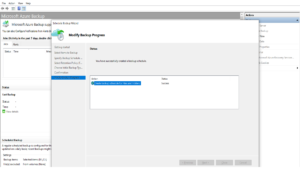
After the procedure in the preceding part has completed, you will notice the following program running on your computer, which was installed in the previous stage. In this step, you’ll be able to select the data folder from your PC that you wish to back up to Azure as well as the backup frequency. Click ‘Schedule Backup’ from the right panel.
let’s select the data folder named ’OtherActivies’ from ‘D Drive’
Select how long you want to retain the backup in your online storage in the next step. Set it up according to your requirements

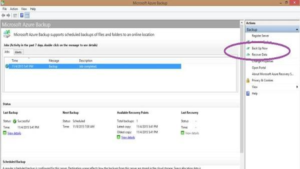
In the backup agent’s left panel, select ‘Backup Now.’ It will immediately save a copy of your info. Then, on your management portal, pick the backup vault and navigate to its dashboard
Step-4 : Data from Azure can be recovered
You can recover the data by selecting ‘Recover Data’ in backup agent and following the wizard
Conclusion:
Data is basically kept “offsite” in secure data storage in Microsoft Azure, thus services like Azure Backup may be able to eliminate the requirement to store backups offsite on tape backups.
Explore more on Serverless Notes