A refresh token is a special token that lets the user to refresh the access token without asking the user to login again. A refresh token will be generated with expiry time until that the user can make request for getting a new access token with the refresh token
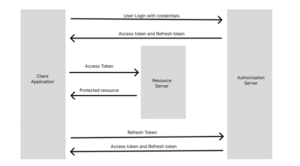
Why Refresh token?
Uninterrupted User Experience:
Usage of refresh token extends the session duration of user and prevents unnecessary reauthentication. For example, if an access token is only valid for 10 minutes, but the user is on the application for 15 minutes, the session may abruptly terminate. This is not ideal and leads to poor user experience. Usage of refresh token is a better approach, which enables new access tokens to be issued without a delay or additional effort
Improved Security:
The use of refresh token makes it feasible to short the lifespan of access tokens. Since the access tokens are used for accessing APIs, any legitimate user that possesses it is considered authenticated without any additional identification. The longer the access token remains valid, the higher the risk of it becoming stolen. Pairing long duration of refresh tokens and short duration of access tokens enhances security.
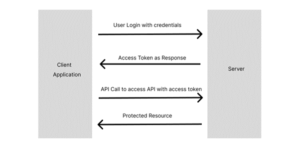
What is Token Based Authentication?
Before getting into example lets see what is token and token-based authentication is.
Tokens:
Tokens are piece of data that carry which is been used to facilitate the process of identifying user’s identity and to authorize the user while accessing a protected resource in server.
In token-based authentication, client will pass their credentials to the user at the time of login. The server verifies the credentials and if it is a valid user, then it will return a signed token to the client with an expiration time. The client can store the token in the client side and if the client makes any call to the server for data, then it does not need to send the credentials again and again instead pass the token to the server. The server validates the token and if it is a valid one, the server provides access to the data.
Access Tokens:
Access tokens are short lived tokens used in token-based authentication to allow an application to access the APIs in the server. Access tokens are issued to after the user is successfully authenticated with valid credentials. While user makes request to the server, the access token will be passed as Bearer token in the request header. With this token the server understand that the bearer of the token is authorized to access the resource until the token gets expired
Implementing Refresh token in web API Project
Now we create a new web API project though .net CLI. Type the following command to create a new web API project.
dotnet new webapi -o newRefreshTokenProject
cd newRefreshTokenProject
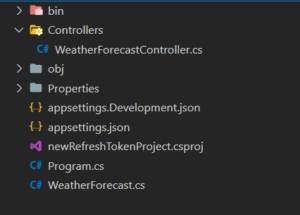
Remove WeatherForecast.cs and WeatherForecastController.cs from the project folder
Install the following NuGet packages in your project
- EntityFrameworkCore.SqlServer
- AspNetCore. Authentication.JwtBearer
- EntityFrameworkCore.Design
- IdentityModel.Tokens
- IdentityModel.Tokens.Jwt
Creating Models and Controllers
- Create a new folder Models which contains entity classes of our application.
- Create new .cs file UserModel.cs inside Models folder
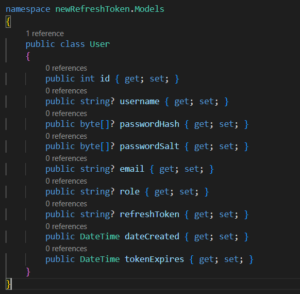
- Create new class User with the properties as shown below
UserModel.cs
Above you can see properties refresh token, dateCreated and tokenExpires. In our project we will generate a new refresh token at the time of user login and store it in our database along with the dateCreated property and tokenExpires which contains the validity and created date of refresh token
- Create a new Sql database in SQL server
- Add the connection string of newly created database in appsettings.json file as below
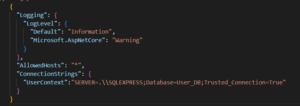
appsettings.json
- Create a new context class by inheriting DbContext class
- Add User class as Dbset property in the context class
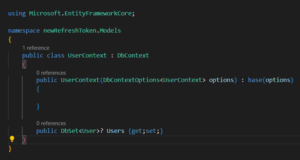
UserContext.cs
- Register your DbContext class in Program.cs file as a service with Dependency Injection. Pass your connection string from appsettings.json like below. These options will be passed to the base DbContext class
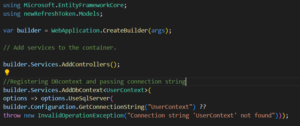
Program.cs
- Create Migration to track all the changes that you made in the entity and context class by using the following command
dotnet ef migrations add <migration_name>
- You will find a new folder name Migrations in your project folder.This migrations contains all the changes you made in the entity classes
- To update these changes in your database use the following command.The following command updates all your changes in the database
dotnet ef database update
Create API for User Registration
- Create a new controller UserController.cs under Controller folder
- Specify the controller with [ApiController] attribute. This attribute indicates that the controller responds to web API requests.Controllers are just class which inherits the ControllerBase base class
- Create an instance _context of UserContext class.
- Inject the Dbcontext service in the UserController class and assign the value of instance to the local instance of UserContext class
- Create an action method Register along with the attribute [HttpPost(“register”)].This attribute means that this action method can invoked when a POST request hits the endpoint “/api/user/register”
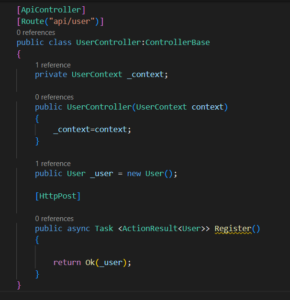
UserController.cs
It is good practice to use DTO classes for receiving inputs from the client. So, create DTO class named UserRequest.cs. Create property that you desire to get from the client
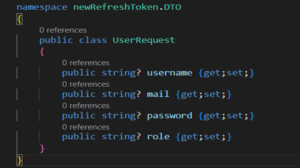
UserRequest.cs
Add the following code in your action method “Register”. The action method checks whether the username is already exists in the database or not.If yes it will send a response “Username already exists ”.If not it will hash the password received from the client and save the record in the database
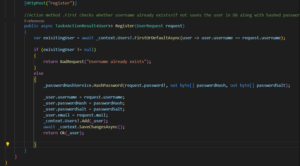
UserController.cs with Action method for User Registration
Creating API for User Login
Create an action method named “Login” along with the [HttpPost (“login”)] attribute.
For this method create a DTO class named UserLoginRequest.cs with the properties username and password. I created separate services for generating tokens and hashing passwords and injected those services in the constructor via Dependency injection.
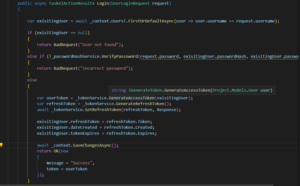
UserController.cs with Action method for User Login
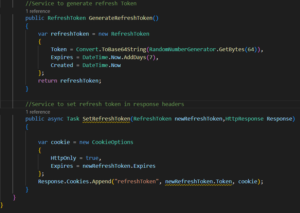
In the above code you can find service GenerateAccessToken () and GenerateRefreshToken (). These services are used to generate access token and refresh token for the user. SetRefreshToken () service used to set the refresh token in response headers. Whenever the user sends request to the server you can find refresh token is been send to the server
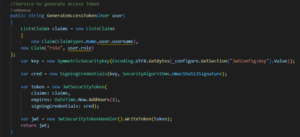
TokenRepository.cs
In the above GenerateRefreshToken() service ,I created an instance for RefreshToken class with the values for its properties. A random base64 string would be generated and assigned to the Token property. Current Date would be taken as value for Created property and 7days from the created date would be taken as a value for the Expires property
SetRefreshToken() service set our refresh token in the cookies as HttpOnly cookie along with an expiry date.Then our refresh token will be appended with the response headers
Creating API for accessing Authorized Resources
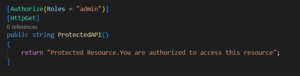
Create an Action method called ProtectedAPI() which just returns a string “Protected Resource. You are authorized to access this resource”.Add [Authorize(Roles=”admin”)] attribute to make this action method can be accessed only by the users with role as admin.
UserController.cs with API for Authorized User
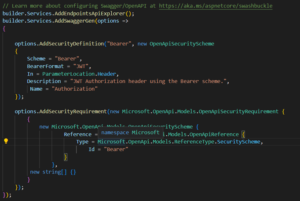
Add Authentication service in the Program.cs with JwtBearerDefaults as default authentication scheme and Token Validation parameters and AddSecurityRequiremen() , AddSecurityDefinition() in AddSwaggerGen() service to enable authorization in swagger UI

Program.cs with Basic Authentication scheme and Security scheme for swagger
Now you can access the the protected API with the your access token.Now I Login with admin user I already created.
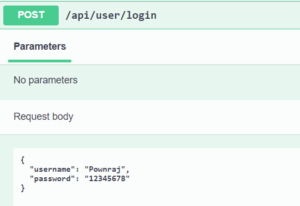
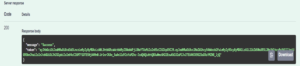
Testing User Login with Swagger
Copy the access token and add it in the headers by clicking the Authorize option as bearer token
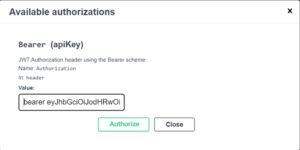
Setting Authorization Header in swagger with Bearer Token
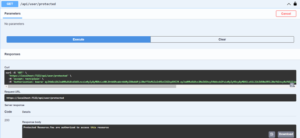
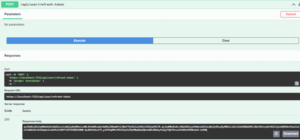
Now call the protected API.Now you will see the response message
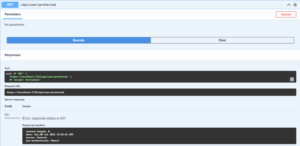
If you try to access the API without access token you will see an 401 Unauthorized Error response
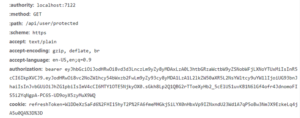
Check the network tab by using Ctrl+Shift+I shortcut key.Now you can see that our refresh token is been appended with the response headers and request headers.
Creating API for generating new Access token with Refresh Token
Now create an action method called Refreshtoken() with [HttpPost] attribute.
This action method extracts the refresh token from the Request header and check with the database whether any records match with this refresh token. If record not found it will send bad request as response. If not, it will check the expiry time of the refresh token. If the refresh token is valid one then this action method will send new access token as response to the user.
Conclusion:
Implementing refresh token in your web API project helps you to add additional security to your resources by shortening the life time of access tokens. It is the responsibility of client side application to call API with refresh token while access token validity ends to generate new one
I hope this blog provided an insight into refresh tokens and how you may utilize these in your applications. Find the source code in the GitHub link .
GitHub Link: https://github.com/Pownraj-2818/Refresh_token_WebAPI.git
Git is a free and open-source distributed version control system that can handle everything from tiny to extremely large projects quickly and efficiently. It was developed in 2005 by Linus Torvalds, creator of Linux Operating System.
To know more view: https://www.techmeet360.com/blog/global-information-tracker-git-workflow-and-terminologies/