Glint job portal app is a web application that allows job seekers to conveniently identify and apply for their desired employment.
A Sneak Peek at the Tech Stack:
Frontend Stack:
-
- Angular 14
- Dependency Injection
- Prime NG
- Bootstrap
- Routing
- Guards
- Reactive Forms
Backend Stack:
-
- .Net Core 6
- Entity Framework
- JSON Web Token for Authorization
- Database in Azure
- Azure Blob Containers
- Azure App Service
- Angular
- .Net
- Azure Logic Apps
This App contains two modules:
-
- Employer Module
- Job Seeker Module
Employer Module:
- Employer can register with the name and information of their company.
- After creating an account, an employer can publish new jobs, edit already-posted jobs, and delete jobs.
- If a candidate is qualified for the position, the employer can examine their profile and be notified that they have been shortlisted.
- If an applicant is selected for further consideration, they will be notified by email and invited to an interview
Job Seeker Module:
- The job seeker has access to a landing page with a search option
- But they need to have registered with Glint if they wish to apply for any jobs.
- They can post a resume to their profile.
- In order to find the list of jobs listed by employers, users will be led to the home page after registering their accounts.
- They can apply for the positions if they are interested in them.
- When a candidate applies, the employer who posted the position will be notified through email.
This app includes the following features:
Employer Module:
- Email Verification using SMTP while registering
- JWT authentication
- Forgot and reset password
- Blob Storage
- Dashboard stats
- Job description and applicants:
- Logic Apps for sending the email Notification on shortlisting the candidates.
SMTP-based Email verification:
The email service using the SMTP server and Mail Message is shown in the screenshot below.
- Create an instance of Mail Message using System.Net.Mail, then add the to Email Address, subject, body, and desired priority.
- After that, make an instance of smtp Client and provide it the host, port, and Enable SSL properties.
- The email can then be sent using the Send() method.
JWT authentication:
- After a user registers with an email address and password, we check to see if they are already registered. We are setting return a Bad Request if registered. In the alternative, we first generate a password hash and salt and then store the user in a database.
- There is a method called create token that is used to produce a JSON web token when a user logs in, if the password hash is the same.
- We will specify the list of claims that the token must include in the create token method, and we will return a new instance of the symmetric security key.
- The token will then be generated using the JWT Security Token class and returned.
- The user can now include that token in subsequent requests.
Click here to know more about JWT.
Forgot / Reset Password:
Forgot password page gets the email address as input, and we send the One time password to the mail address.User is required to give the correct OTP. Once done, they will be able to create new password.

Forgot Password Method:
- When a password is forgotten, we send an email to the provided email address using the email service. We create an OTP with a length of 6 using the generate OTP function.
- We also set the token’s validity to 5 minutes.
GENERATE OTP METHOD:
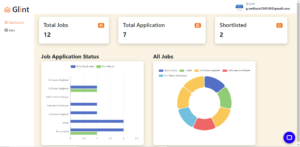
DASHBOARD STATS:
In Employer dashboard, we show the overall stats of the jobs and Applicants which give insights to the employer.
For Charts, we used horizontal charts, where it displays the total applicants for the job and Shortlisted count for individual jobs and pie charts, for displaying the all jobs using E-Charts.
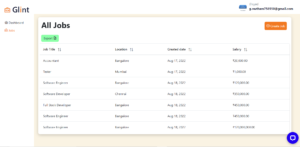
JOBS LIST:
The employer can view all of the jobs that they have posted in the Jobs category. Additionally, they will be able to add new jobs.
In the below get endpoint, we first retrieve the employer Id from the HTTP Context and then use the employer Id to return the jobs listed by that employer.
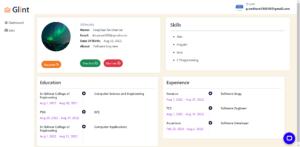
JOB DESCRIPTION AND APPLICANTS:
Employers can view the status of applications for a specific job by clicking on any job by routing with parameters (Job Id) to navigate to the job description page.
Here is the endpoint to get the job by Id,
On clicking the candidate, the route will navigate to Candidate profile.
API endpoint to get the candidate profile using Candidate ID.
BLOB STORAGE:
Azure Blob Container:
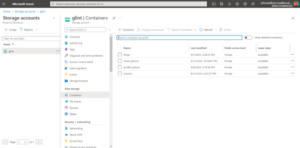
Here is the below Method to add the profile picture in the blob container.
- In the procedure above, we first obtain the user id from an HTTP Context instance.
- We are retrieving the user using the user id.
- After that, the file name is generated using the input filename, user name, and image.
- We set the connection string and container name as parameters in the Blob Container Client.
- After that, we upload the image to the blob by turning it to a stream of bytes.
- At last, we update the database.
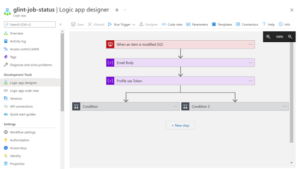
LOGIC APPS FOR EMAIL NOTIFICATION:

- The logic app architecture shown above is used to send an email notification to the employer each time a candidate applies for a job.
- In this section, we’ve created a series of actions, such as having this logic app activate when a candidate applies for a job and the status changes to applied.
- In this case, we are retrieving the Employer Id from the users table and the Job Id from the Jobs Table.
- Next, we notify the employer that the specific applicant has submitted an application for the position.
2.Job Seeker Module:
- Email Verification using SMTP while registering
- JWT authentication
- Forgot and reset password
- Blob Storage
- Dashboard with Job List
- Filtering the jobs based on location, designation using Sieve model
- Logic Apps for sending the email Notification on status of applied Jobs
DASHBOARD WITH JOB LIST:

- All of the open positions will be published on the job seeker dashboard.
- When a job card is clicked, the full job description and an apply link are both presented.
- They can apply if they are interested in the position.
- After submitting an application, the hiring employer will be notified through email.
API Endpoint for displaying the jobs in the dashboard:
In the below Action method, we are getting the list of non-applied as well as the filtered jobs list.
FILTER JOBS:
For filtering features, there is a model called the Sieve Model. Sieve is a simple, organized, and extendable framework for.NET Core that has built-in pagination, filtering, and sorting capabilities.
- The filters that we gave as query arguments are returned as an instance of the Sieve Model in the code above.
- Here, we first get the list of open positions and then the whole job list.
- The filter is then applied to the entire job list using the Apply technique in the following step.
- As a result, we return the final job list after determining whether the applied Job Id and posted Job Id match.
Logic Apps for sending the email Notification on status of applied Jobs:
- The aforementioned logic software is made to send emails to job seekers informing them of the status of their applications.
- This logic app is activated when the table is changed to shortlisted or rejected.
Conclusion:
Glint was developed in ten days by a three-person team. We put the Tech Stacks and principles we learned during our three-month training programme into action. Many thanks to John Edelbert and Gowtham for their help in building Glint.
Source Code Link :
Frontend – https://github.com/gowtham758550/glint
Backend – https://github.com/edel-rex/GlintApi
To know more about Git, refer, https://www.techmeet360.com/blog/global-information-tracker-git-workflow-and-terminologies/