Introduction:
Azure Firewall Manager is a centralized security management solution that provides organizations with a way to manage multiple Azure Firewall instances and policies across their entire cloud infrastructure. With Azure Firewall Manager, organizations can set up and configure Azure Firewall policies, view and analyse firewall logs and metrics, and manage firewall rules and configurations for their entire cloud infrastructure from a single console.
Routing methods, on the other hand, refer to the various ways in which network traffic is directed between different endpoints in a network. In Azure, there are several routing methods available, including User Defined Routes, Azure Route Tables, Azure Traffic Manager, and Azure Load Balancer. These routing methods help organizations to effectively manage and control network traffic flows within their cloud infrastructure and optimize network performance.
User Defined Routes allow administrators to override the default routing tables in Azure and specify custom routes for traffic to specific destinations. Azure Route Tables provide a way to manage traffic routing within a virtual network, while Azure Traffic Manager enables organizations to control traffic between different Azure regions or across different cloud providers. Azure Load Balancer is a traffic load balancing solution that distributes incoming traffic across multiple backend servers for improved performance and availability.
Together, Azure Firewall Manager and routing methods provide organizations with a comprehensive security and network management solution for their Azure cloud infrastructure. By using these tools, organizations can optimize their network performance, enhance their security posture, and reduce the complexity of managing their cloud infrastructure.
Overview of Azure Firewall Manager
Azure Firewall Manager provides several features and capabilities for managing firewall policies and configurations across multiple Azure Firewall instances and virtual networks. Some of the key features and capabilities of Azure Firewall Manager include:
Centralized management: Azure Firewall Manager provides a centralized management console for managing multiple Azure Firewall instances and policies across an organization’s entire cloud infrastructure.
Policy-based management: Azure Firewall Manager uses policy-based management, which allows administrators to define security policies once and apply them across multiple firewalls and virtual networks. This simplifies management and reduces the risk of misconfigurations.
Integration with Azure Security Center: Azure Firewall Manager integrates with Azure Security Center to provide enhanced threat detection and monitoring capabilities. This integration allows organizations to monitor their network traffic, detect potential security threats, and take action to prevent them.
High availability: Azure Firewall Manager provides high availability for firewall instances by automatically deploying new instances in the event of a failure. This ensures that network traffic is always protected, even in the event of a hardware failure or other issue.
Scalability: Azure Firewall Manager is designed to be highly scalable, allowing organizations to easily scale their security infrastructure as their cloud footprint grows.
Customizable rules and policies: Azure Firewall Manager allow administrators to define custom firewall rules and policies based on specific network traffic patterns and requirements.
Application FQDN filtering: Azure Firewall Manager supports application FQDN filtering, which allows organizations to filter traffic based on the fully qualified domain name (FQDN) of the application.
Secure virtual hub: Azure Firewall Manager allows organizations to create a secure virtual hub for their cloud infrastructure, which provides centralized management and monitoring of network traffic across multiple virtual networks.
Transit routing: Azure Firewall Manager supports transit routing, which enables organizations to route traffic between virtual networks and on-premises networks using Azure Firewall Manager as a hub.
Overall, Azure Firewall Manager provides a comprehensive security management solution for enterprise networks in the cloud. By centralizing management, simplifying policy enforcement, and providing enhanced threat detection and monitoring capabilities, Azure Firewall Manager helps organizations to enhance their security posture and reduce the complexity of managing their cloud infrastructure.
Routing Methods in Azure Firewall Manager
Azure Firewall Manager provides several routing methods that can be used to control network traffic and improve network security. Some of the key routing methods available in Azure Firewall Manager include:
Priority: Select Priority if you want to use a primary service endpoint for all traffic and provide backups in case the primary or backup endpoints are unavailable.
 Often, an organization will want to ensure the reliability of its services by deploying one or more backup services in the event that their primary service fails. Azure customers can easily implement this failover pattern thanks to the ‘Priority’ traffic-routing method.
The Traffic Manager profile includes a prioritized list of service endpoints. Traffic Manager sends all traffic to the primary (highest priority) endpoint by default. If the primary endpoint is unavailable, traffic is routed to the secondary endpoint. If neither the primary nor secondary endpoints are available, traffic is routed to the third, and so on. The endpoint’s availability is determined by the configured status.
Weighted: When you want to distribute traffic evenly or based on weights that you define, choose Weighted.
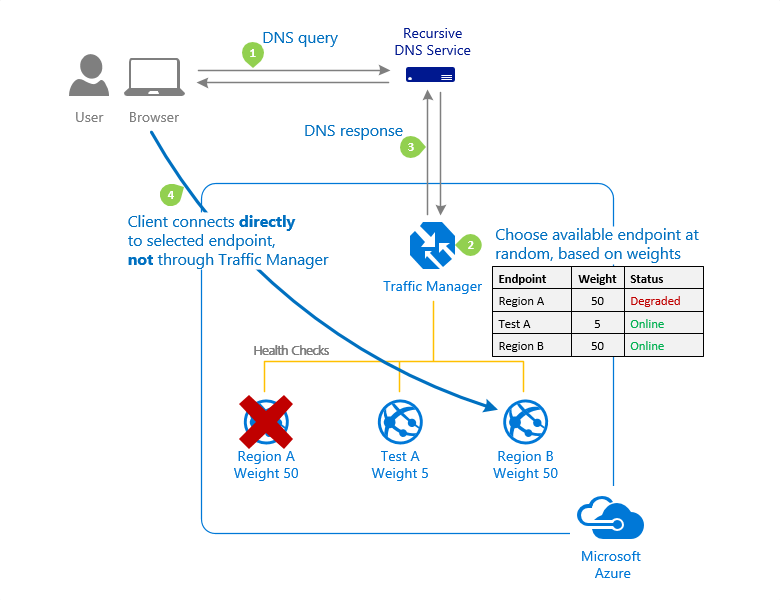
In the Traffic Manager profile configuration, you assign a weight to each endpoint when using the Weighted traffic-routing method. The weight is an integer between 1 and 1000. This parameter is not required. If this parameter is left blank, Traffic Managers will use the default weight of ‘1’. The greater the weight, the greater the priority.
Traffic Manager selects an available endpoint at random for each DNS query received. The likelihood of selecting an endpoint is determined by the weights assigned to all available endpoints. When all endpoints are given the same weight, traffic is distributed evenly. When specific endpoints have higher or lower weights, those endpoints are returned more or less frequently in DNS responses.
Performance: When you have endpoints in different geographic locations and want end users to use the “closest” endpoint in terms of network latency, choose Performance.
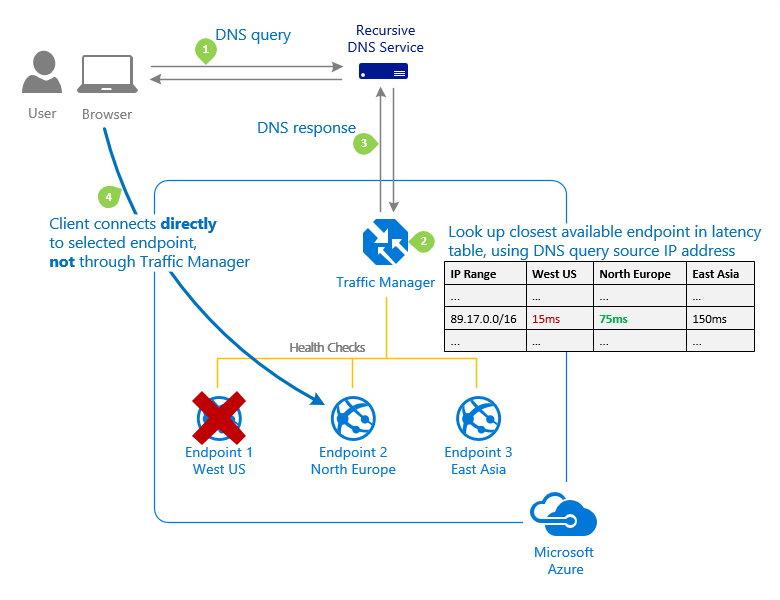
Endpoints deployed in two or more locations around the world can improve the responsiveness of many applications by routing traffic to the ‘closest’ location to you. This capability is provided by the ‘Performance’ traffic-routing method.
The ‘closest’ endpoint is not always the closest in terms of geographic distance. The ‘Performance’ traffic-routing method, on the other hand, determines the closest endpoint by measuring network latency. To track the round-trip time between IP address ranges and each Azure datacenter, Traffic Manager keeps an Internet Latency Table.
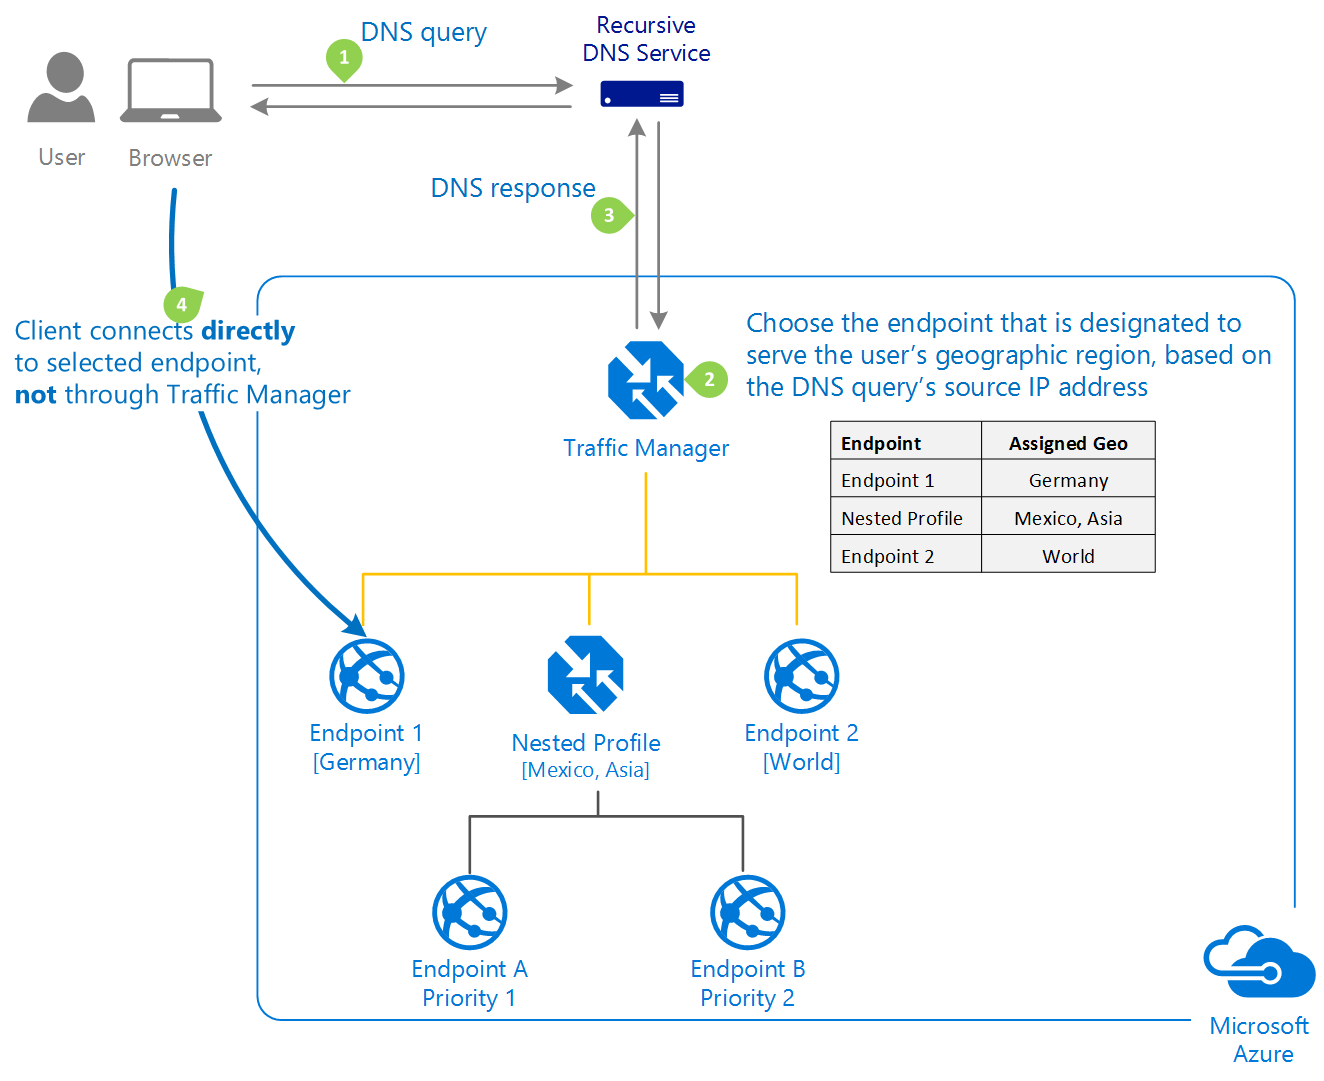
Geographic: Select Geographic to direct users to specific endpoints (Azure, External, or Nested) based on their DNS query’s geographic location. Customers using Traffic Manager can now enable scenarios in which knowing a user’s geographic region and routing them accordingly is advantageous.
Traffic Manager profiles can be configured to use the Geographic routing method, which directs users to specific endpoints (Azure, External, or Nested) based on the geographic location from which their DNS query originates. This enables Traffic Manager customers to enable scenarios in which knowing a user’s geographic region and routing them accordingly is critical. Compliance with data sovereignty mandates, localization of content and user experience, and measuring traffic from different regions are some examples. When a profile is configured for geographic routing, each endpoint associated with that profile must be assigned a set of geographical regions. A geographic region can be classified at the following levels of granularity.
Real-time examples of these routing methods in different scenarios include:
User-defined routes: An organization might use user-defined routes to direct traffic from a specific subnet to a virtual appliance that provides additional security or monitoring capabilities, such as an intrusion detection system (IDS) or a web application firewall (WAF).
Forced tunnelling: An organization might use forced tunnelling to prevent traffic from being sent directly to the internet and instead route all traffic through a central VPN gateway for inspection and monitoring.
Hub and spoke architecture: An organization might use the hub and spoke architecture to centralize network traffic and security controls, providing a single point of management and control for multiple virtual networks and resources.
Transit routing: An organization might use transit routing to connect multiple virtual networks and on-premises networks together, allowing resources to communicate with each other securely and efficiently.
Overall, these routing methods provide organizations with a range of options for controlling network traffic and improving network security in the cloud. By leveraging these routing methods, organizations can better manage their cloud infrastructure and reduce the risk of security threats and other issues.
Configuring Routing Methods in Azure Firewall Manager
Configuring routing methods in Azure Firewall Manager involves several steps, depending on the routing method being used. Here are step-by-step instructions for configuring user-defined routes, forced tunnelling, and hub and spoke architecture:
Configuring User-defined Routes
- In the Azure portal, navigate to the virtual network where you want to configure user-defined routes and select “Routes” from the left-hand menu.
- Click the “+Add” button to create a new route.
- In the “Add route” pane, enter a name for the route and specify the address prefix for the traffic you want to route. You can also specify the next hop type and IP address for the route.
- Click the “OK” button to create the new route.
- Repeat steps 2-4 for each additional user-defined route you want to create.
- Once you have created all of your user-defined routes, click the “Save” button to apply the changes.
Configuring Forced Tunnelling
- In the Azure portal, navigate to the virtual network where you want to configure forced tunnelling and select “Subnets” from the left-hand menu.
- Select the subnet you want to configure for forced tunnelling.
- In the subnet configuration pane, select “Route table” from the left-hand menu.
- Click the “+Add” button to create a new route table.
- In the “Add route table” pane, enter a name for the route table and specify the IP address of the VPN gateway you want to use for forced tunnelling.
- Click the “OK” button to create the new route table.
- In the subnet configuration pane, select the new route table you just created from the “Route table” dropdown menu.
- Click the “Save” button to apply the changes.
Configuring Hub and Spoke Architecture
- In the Azure portal, navigate to the virtual network you want to use as the hub and select “Virtual network peering” from the left-hand menu.
- Click the “+Add” button to create a new virtual network peering.
- In the “Add virtual network peering” pane, enter a name for the peering and select the virtual network you want to use as the spoke.
- Select “Use remote gateways” and choose the virtual network gateway you want to use as the hub.
- Click the “OK” button to create the new virtual network peering.
- Repeat steps 2-5 for each additional spoke virtual network you want to connect to the hub.
- Once you have created all of your virtual network peerings, select the hub virtual network and navigate to “Routes” in the left-hand menu.
- Click the “+Add” button to create a new route.
- In the “Add route” pane, enter a name for the route and specify the address prefix for the traffic you want to route.
- Select “Virtual network peering” as the next hop type and choose the virtual network peering you want to use for the route.
- Click the “OK” button to create the new route.
- Repeat steps 8-11 for each additional route you want to create.
- Once you have created all of your routes, click the “Save” button to apply the changes.
Best Practices for Using Azure Firewall Manager and Routing Methods
Here are some tips and best practices for using Azure Firewall Manager and routing methods effectively:
- Understand your network requirements: Before configuring routing methods in Azure Firewall Manager, it’s important to understand your network requirements. This will help you select the right routing method and avoid common mistakes.
- Use user-defined routes for customized routing: User-defined routes allow you to customize routing tables and define specific paths for traffic. This is useful when you have specific routing requirements that are not met by the default routing provided by Azure.
- Avoid forced tunneling if possible: Forced tunneling can increase latency and reduce network performance, so it’s best to avoid it if possible. Instead, use user-defined routes to route traffic to the Internet or other virtual networks.
- Test your routing configuration: Before deploying your routing configuration to production, it’s important to test it thoroughly. Use test traffic to verify that traffic is being routed as expected.
- Monitor your network traffic: Use Azure Firewall Manager’s built-in monitoring and analytics tools to track network traffic and detect potential security threats.
- Use Azure Firewall Manager in conjunction with other security tools: Azure Firewall Manager is just one component of a comprehensive network security strategy. Use it in conjunction with other security tools like Azure Security Center, Azure Active Directory, and others.
- Follow best practices for network security: Finally, be sure to follow best practices for network security. This includes using strong passwords, keeping software up-to-date, and regularly monitoring network traffic for potential threats.
Common mistakes to avoid include misconfiguring routing tables, using forced tunneling unnecessarily, and failing to monitor network traffic for potential security threats. If you run into issues, be sure to check Azure Firewall Manager’s logs and analytics for clues to what may be causing the problem.
In general, it’s important to stay up to date with the latest best practices for network security and to be vigilant about monitoring your network traffic for potential threats. By following these tips and best practices, you can use Azure Firewall Manager and routing methods effectively to protect your network from security threats.
Conclusion
The blog post discusses Azure Firewall Manager and the different routing methods available for enterprise network security. The benefits of using Azure Firewall Manager for network security are explained, along with an overview of its features and capabilities. Different routing methods, such as forced tunneling and user-defined routes, are discussed with real-time examples of their use in various scenarios. The blog post provides step-by-step instructions for configuring routing methods and offers tips and best practices for using Azure Firewall Manager effectively.